Things I learned for today
인턴 시뮬레이션 채팅 UI 구현하기
보슬비처럼
2024. 10. 3. 20:09
안녕하세요,
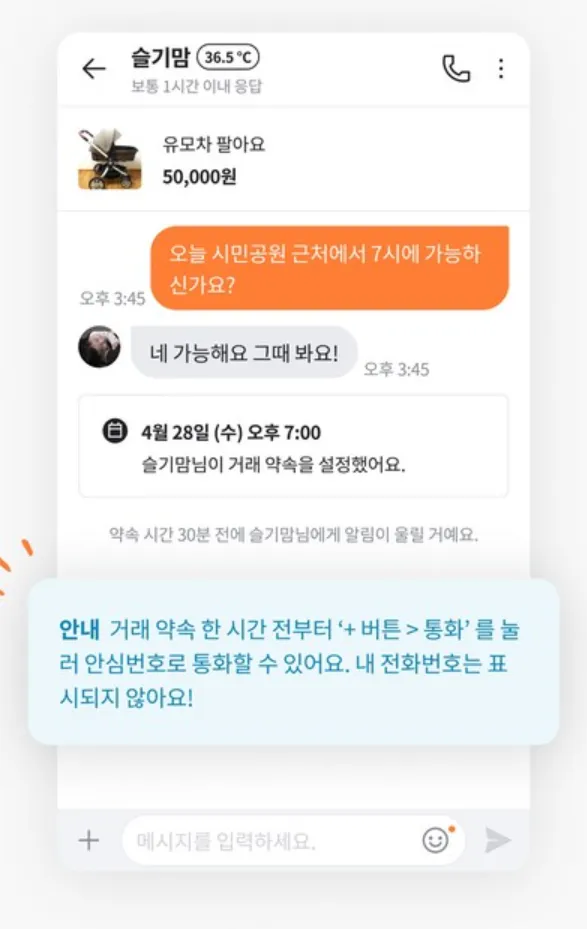
오늘은 여러분의 웹 프로젝트에 활용할 수 있는 채소마켓을 보고 채팅 UI를 구현해보려고 합니다. 이 UI는 기본적인 채팅 기능 외에도 현대적인 디자인 요소들을 포함하고 있어, 다양한 프로젝트에 적용할 수 있습니다.
아래는 HTML과 CSS를 사용한 예시 코드입니다. 이 코드를 복사하여 여러분의 블로그나 프로젝트에 추가하면, 깔끔하고 직관적인 채팅 인터페이스를 완성할 수 있습니다.
### HTML 및 CSS 코드:

```html
<!DOCTYPE html>
<html lang="ko">
<head>
    <meta charset="UTF-8">
    <meta name="viewport" content="width=device-width, initial-scale=1.0">
    <title>채팅 탭 UI</title>
    <style>
        body {
            font-family: 'Noto Sans KR', sans-serif;
            background-color: #f2f4f7;
            margin: 0;
            padding: 0;
            display: flex;
            justify-content: center;
            align-items: center;
            height: 100vh;
        }

        .chat-container {
            width: 380px;
            background-color: #ffffff;
            box-shadow: 0 4px 10px rgba(0, 0, 0, 0.1);
            border-radius: 12px;
            overflow: hidden;
        }

        .header {
            display: flex;
            align-items: center;
            justify-content: space-between;
            padding: 15px;
            background-color: #4A90E2;
            color: #fff;
        }

        .header img {
            border-radius: 50%;
            width: 45px;
            height: 45px;
        }

        .header .username {
            font-size: 18px;
            font-weight: bold;
        }

        .header .status {
            font-size: 14px;
            color: #E0F2FF;
        }

        .item {
            display: flex;
            align-items: center;
            padding: 15px;
            border-bottom: 1px solid #f0f0f0;
        }

        .item img {
            width: 70px;
            height: 70px;
            border-radius: 10px;
            margin-right: 15px;
        }

        .item-info p {
            margin: 0;
            font-size: 16px;
            font-weight: bold;
            color: #333;
        }

        .price {
            color: #FF6F61;
            font-size: 20px;
            font-weight: bold;
            margin-top: 5px;
        }

        .chat {
            padding: 15px;
            background-color: #f9f9f9;
            max-height: 350px;
            overflow-y: auto;
        }

        .chat p {
            padding: 10px 15px;
            border-radius: 20px;
            margin: 10px 0;
            display: inline-block;
            max-width: 70%;
            word-wrap: break-word;
        }

        .chat .left {
            background-color: #eaeaea;
            color: #333;
            text-align: left;
        }

        .chat .right {
            background-color: #4A90E2;
            color: #fff;
            text-align: right;
            margin-left: auto;
        }

        .message {
            display: flex;
            padding: 15px;
            background-color: #fff;
            border-top: 1px solid #f0f0f0;
        }

        .message input {
            flex-grow: 1;
            padding: 12px 15px;
            border-radius: 25px;
            border: 1px solid #ddd;
            font-size: 16px;
            outline: none;
        }

        .message button {
            background-color: #4A90E2;
            border: none;
            padding: 12px 20px;
            border-radius: 25px;
            color: white;
            margin-left: 10px;
            cursor: pointer;
            font-size: 16px;
        }

        .message button:hover {
            background-color: #357ABD;
        }
    </style>
</head>
<body>
    <div class="chat-container">
        <!-- 헤더 섹션 -->
        <div class="header">
            <div>
                <img src="user.jpg" alt="사용자 아이콘">
                <span class="username">슬기맘</span>
                <div class="status">(36.5°C)</div>
            </div>
            <div class="temp">
                보통 1시간 이내 응답
            </div>
        </div>

        <!-- 상품 정보 섹션 -->
        <div class="item">
            <img src="stroller.jpg" alt="유모차">
            <div class="item-info">
                <p>유모차 팔아요</p>
                <div class="price">50,000원</div>
            </div>
        </div>

        <!-- 채팅 섹션 -->
        <div class="chat">
            <p class="left">오늘 시민공원 근처에서 7시에 가능하신가요?</p>
            <p class="right">네 가능해요! 그때 봐요!</p>
        </div>

        <!-- 메시지 입력 섹션 -->
        <div class="message">
            <input type="text" placeholder="메시지를 입력하세요...">
            <button>전송</button>
        </div>
    </div>
</body>
</html>
```
위 코드를 사용하면, 여러분의 블로그 또는 프로젝트에 세련된 채팅 UI를 손쉽게 추가할 수 있습니다. HTML과 CSS를 조정하여 원하는 디자인을 만들 수 있으며, 이미지를 적절하게 변경하여 자신의 프로젝트에 맞는 UI로 커스터마이즈할 수 있습니다.
반응형